How does Huawei router configure servers in the Intranet to be accessible in the External Network? Now I have sorted out the configuration method of Huawei AR series routers, which can help those novices like me. You can refer to it.How does Huawei router configure servers in the Intranet to be accessible in the External Network? Currently, the online configuration tutorials are all command-line. It's painful for a novice like me to have no web tutorials.
What have I done to set up Huawei AR router
After searching for a large circle on the Internet and failing to find the detailed configuration method of WEB, we finally got it through our own slow exploration and guess. So we have this tutorial to help novices like me.Huawei AR routers should be configured in the same way. If the web interface is different, you can try upgrading the system.When there is no port reflux, only the external host can access the internal server through the IP + port number of the external network. After the port reflux is opened, the intranet host can also access the intranet server through the IP + port number of the external network. The specific reason is Google itself. I will not elaborate here.
How to set
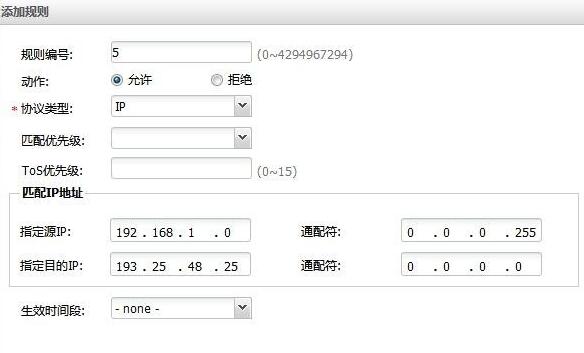
- I need both the intranet and the intranet to access the intranet server (192.168.1.19:80) through the IP + port number of the extranet (193.25.48.25:50080).
- Open the browser to access the routing management page, default address 192.168.1.1
- Enter the administrator's username and password in the login interface and click login. The default username is admin's default password: Admin@huawei
- When you log in, default display of the main interface. Click on the toggle button in the upper right corner.
- Click Cancel on the pop-up prompt box.
- After the last step, I switched to the WEB network management interface, and immediately began to get to the point.
- Click on the IP service on the left.
- ClickNAT.
- Check the FTP option and click the OK button.
- ClickSafety on the left.
- Select the Advanced ACL Configuration tab, click the New button, enter the ACL name a3002, and then click ok.
- Click on the advanced button that just popped up.